
This is a blog post on how to create a Enterprise Deployment of Adobe Reader.
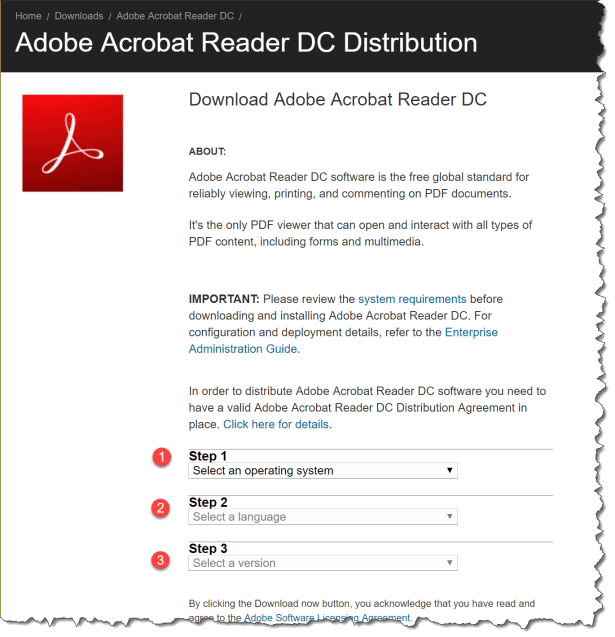
First you need to download the Adobe Reader Enterprise
- Select an Operating system
- Select a language
- Select a version
After you have downloaded the installer you can extract the .exe files so you can access the .MSI file
The parameters are:
-sfx_ne : Do not execute any file after installation (overrides the -e switch) This switch should be used if user only wants to extract the installer contents and not run the installer.
-sfx_o : Specifies the name of folder where the expanded package is placed. The folder name should be enclosed in quotation marks. It is best if you do not use an existing folder.
-sfx_nu : Silently extracts the installation files from the EXE.
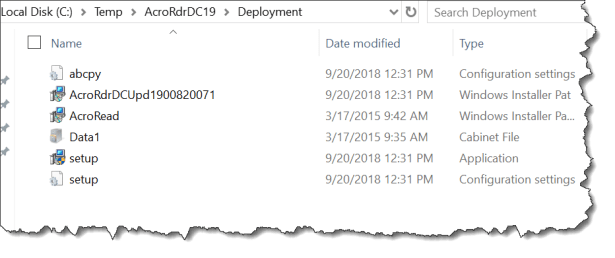
.\AcroRdrDC1900820071_en_US.exe -sfx_o”c:\temp\AcroRdrDC19\Deployment\” -sfx_ne

Then the installer is extraction

All the files are extracted in the path you stated in the extraction command
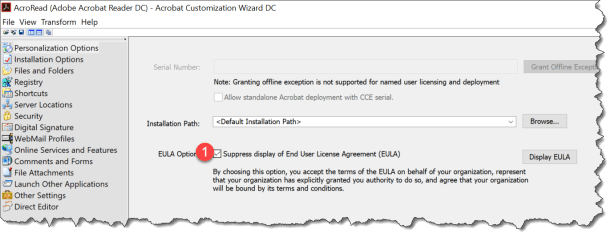
After you have extracted the installer and having access to the .MSI file then you can create a .MST file with the Acrobat Customization Wizard DC
Start the Acrobat Customization Wizard DC

- Click Open Package and point to the .MSI file

Then you can start using the Wizard to customize the installation
Under Personalization Options
- Click Suppress display of End User License Agreement (EULA)
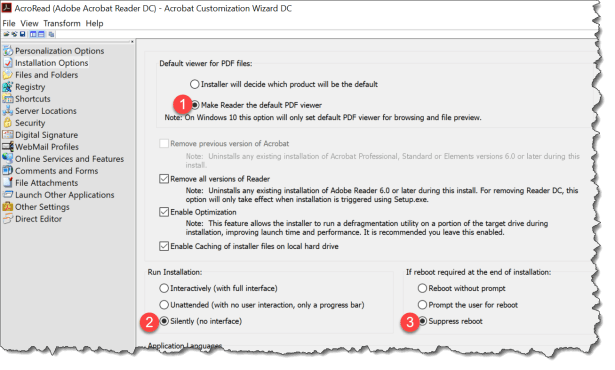
Under Install Options
- Click Make Reader the default PDF viewer
- Click Silently (no interface)
- Click Suppress reboot
Under Shortcuts
- Click remove the Adobe shortcuts on Desktop

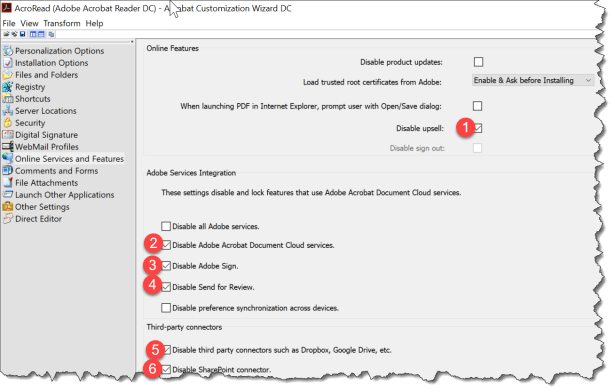
Under Online Services and Features
- Disable upsell
- Disable Adobe Acrobat Document Cloud Serivces
- Disable Adobe Sign
- Disable Send for Review
- Disable third party connections such ad Dropbox, Google Drive, etc.
- Disable Sharepoint connector
Then you are ready to
- Save Package
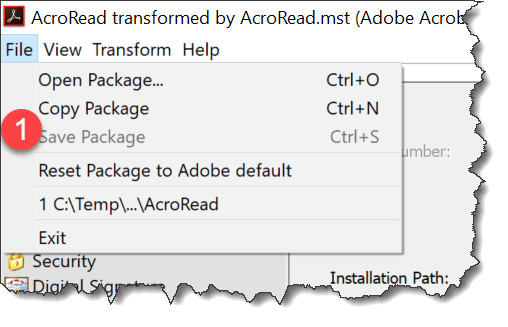
A .MST file is automatic created the same are setup.ini that sets all the silent parameters and point to both .MST and .MSP file
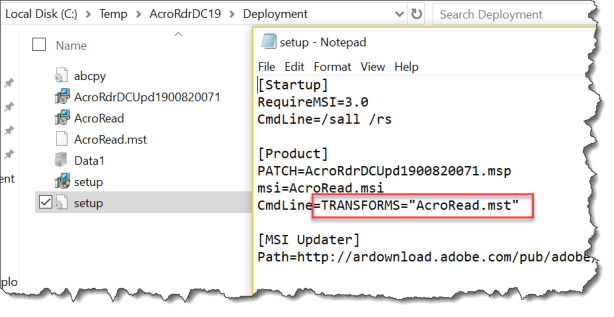
Then you are ready to deploy Adobe Reader with your favorite deployment tool by running the setup.exe -s
More info:
Adobe Enterprise Administration Guide


Nice and very detailed post!
I’ve done this for a while with good success. Only thing I noticed is during the extraction, the trailing backslash “\” is not needed otherwise it prompts for the destination folder. Right before the -sfx_ne section.
.\AcroRdrDC1900820071_en_US.exe -sfx_o”c:\temp\AcroRdrDC19\Deployment” -sfx_ne
Thanks!
Good post!
I use
[Product]
PATCH=”*.msp”
….
In setup.ini and only replacing patches in content folder
How about a follow-up to distribute via InTune ?
It is there now 😀
🙂
Thank you so much. Worked like a charm. Recently moved a customer to Azure and Intune, and I’ve been struggling with how to publish Adobe Reader, until now 🙂 Great job.
.\AcroRdrDC1900820071_en_US.exe -sfx_o”c:\temp\AcroRdrDC19\Deployment\” -sfx_ne
…it just permanently deleted all my desktop files… amazing…
You could do better than just giving us a warning saying “It is best if you do not use an existing folder.”
Still my go to guide on Reader deployment, 2020 still working in all its glory
Have you been able to do this with Adobe DC Pro? – Reader works great but pro version is timing out on install on intune, it just then fails
is there any additional cost of using adobe reader from Intune If a company has Intune license already?
2: is it necessary to disable all these options during conversion? what if i leave few options unchecked?
3: what features this app installation provides to the users?
Is there a way to block access to gmail, hotmail, yahoo or nay other email provider using intune?