
Window Autopilot is getting better and better with every release of Microsoft Intune and Windows 10 build. The latest is that we can put a Autopilot payload down on the device before the OOBE and then make it a Autopilot device without collection the hardware hash for older devices or get the information from the OEM or reseller.
Back in October 2015 when I did my first Azure AD joined deployment in a public school, that was before Windows Autopilot but we had some of the same issue that we have today, one question was do we use the OEM image already on the device or do we use a custom image, at that time there was no good way of getting Office 365 click to run installed on the devices after they was Azure AD joined – so we went with a custom image deployed with MDT – see my blog post on who we did it here – today we can just deploy the Office 365 as an application directly from Intune in a nice and easy way.
Today we got Windows Autopilot and will love to use that – but have a similar issue, we have already deployed Windows devices deployed in a on-prem Active Directory and what to confirm them into a cloud managed device with Azure AD joined and Intune management – but there is no easy way of doing that. But with Windows 10 1809 we can deploy a Autopilot payload to the device before the OOBE and it will be a Autopilot device with all the advances it gets. This is a remaking of a blogpost I did in that start of November 2018
The outline of this blog post is:
- Deploy a custom updated image to a existent Windows device with MDT
- Download the Autopilot payload
- Get Windows installed
- Cleanup after MDT
- Deliver the device Autopilot enabled to the end user without having to collect the hardware hash and upload it to the Autopilot service
Prerequisite:
- Windows 10 1809 or later
- Azure AD P1 or P2 (A1 for Education – part of Intune for Education)
- Microsoft Intune
- Already created a Autopilot profile in Intune
- Azure AD or Azure AD preview powershell module
- Already have a MDT deployment solution up and running
How to get the Windows Autopilot payload:
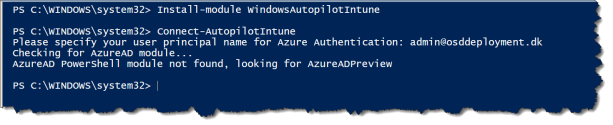
We have to install the new WindowsAutopilotIntune powershell module
Install-module WindowsAutopilotIntune

Connect to Autopilot Intune – with your Azure AD admin
Connect-AutopilotIntune
Run the command to get the Intune Autopilot profile and convert it to .json
Get-Autopilotprofile | ConvertTo-AutopilotconfigurationJSON

Then you can copy the content of the Autopilot profile to notepad and save as AutopilotConfigurationFile.json
Note: I had issue getting the AutopilotConfigurationFile.json working after copied the content to notepad – after ensuring that “CloudAssignedAadServerData” was in one line in the file every thing worked as a charm!
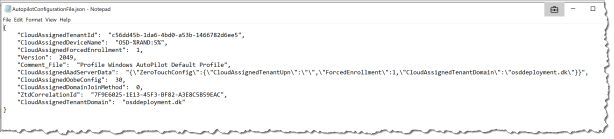
Note: remember to save as ANSI
Now we have the AutopilotConfigurationFile.json and are ready to create the MDT task Sequence.
How to customize the MDT Task Sequence for Autopilot:
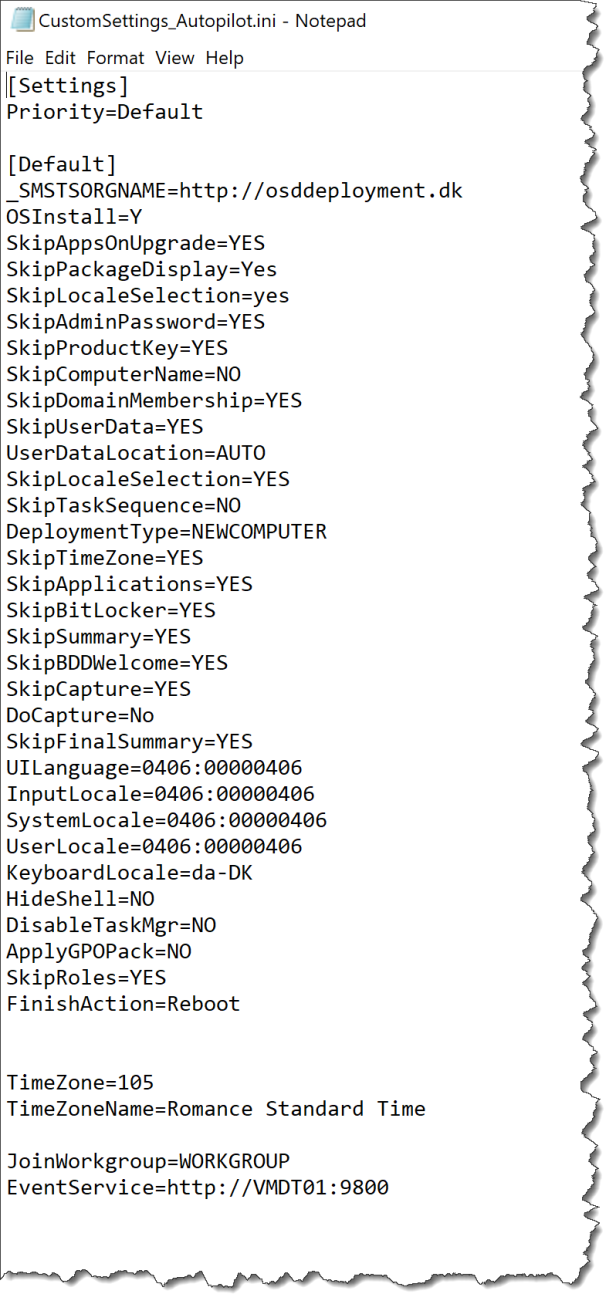
In my case I use the MDT deployment share to other deployment as well as the Windows Autopilot deployment – so I will use a customsettings.ini from a task sequence
You need to create a custom deployment MDT task sequence then you can start make the changes to get it working for Autopilot deployment.
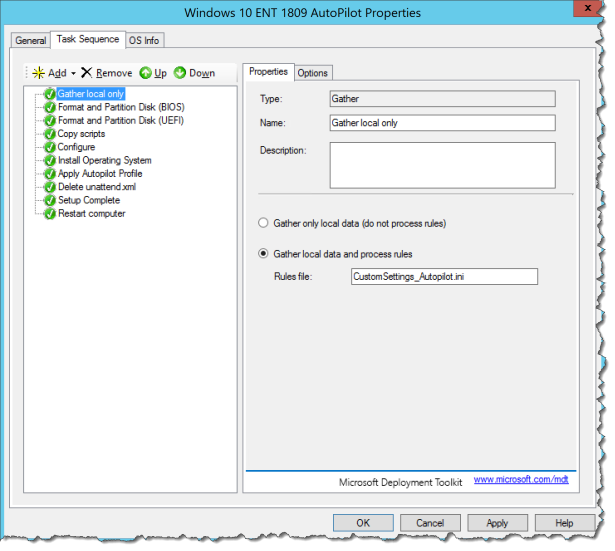
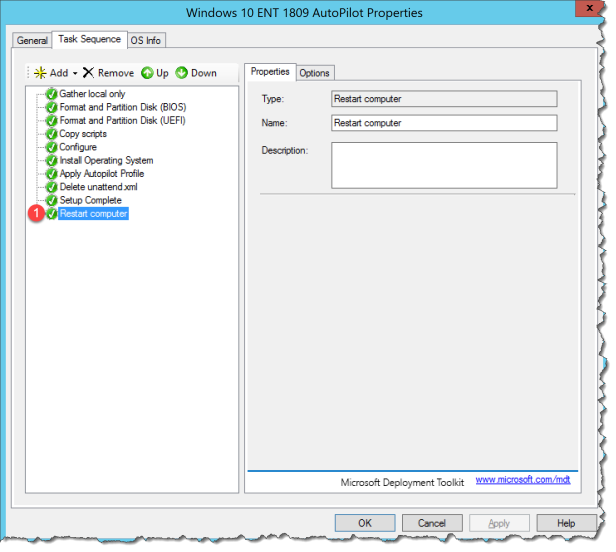
In my case I adds 10 steps into a custom MDT task Sequence:
- Gather local (Set a new Customsettings.ini (optional))
- Format and Partition Disk (BIOS) (Only use this if the devices do not support UEFI)
- Format and Partition Disk (UEFI)
- Copy scripts (Step from a standard MDT Task Sequence)
- Configure (Step from a standard MDT Task Sequence)
- Install Operating System
- Apply the AutopilotConfigurationFile.json to the new device
- Delete unattend.xml
- Copy a SetupComplete.cmd to run some post cleanup after MDT
- Restart computer so that the device will end up in OOBE for the end user
First create your CustomeSettings_Autopilot.ini file – the one I use can be downloaded from here the file needs to be stored in your MDT deployment share under the Control folder.
In my case the important is that the device is not getting domain joined but ends up in a workgroup
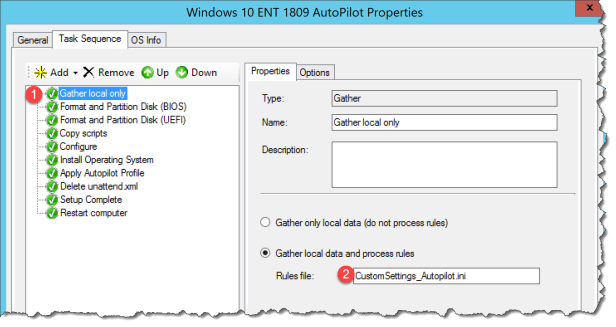
1 : Create a new “Gather local only” step
- Create a new “Gather local only” step
- Change to “Gather local data and process rules” with the rules file : CustomSettings_Autopilot.ini
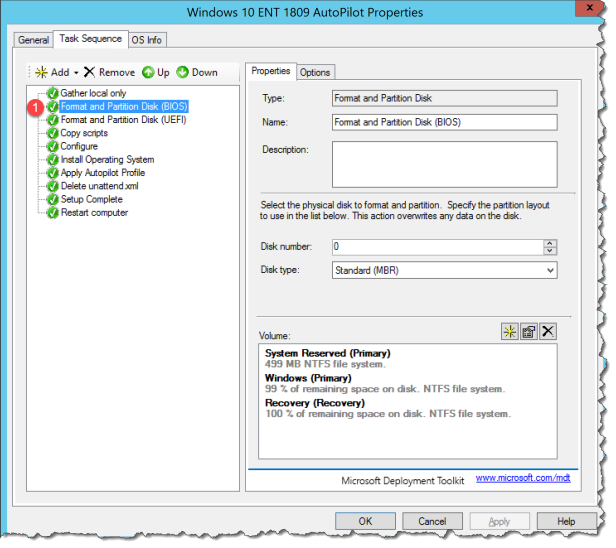
2 : Format and Partition Disk (BIOS)
This step is to support legacy hardware that do not support UEFI – don’t use this on a new device that supports UEFI.
- Create a new “Format and Partition Disk (BIOS)” step
3 : Format and Partition Disk (UEFI)
This step is to configure the disk layout correct for a UEFI device
- Create a new “Format and Partition Disk (UEFI)” step

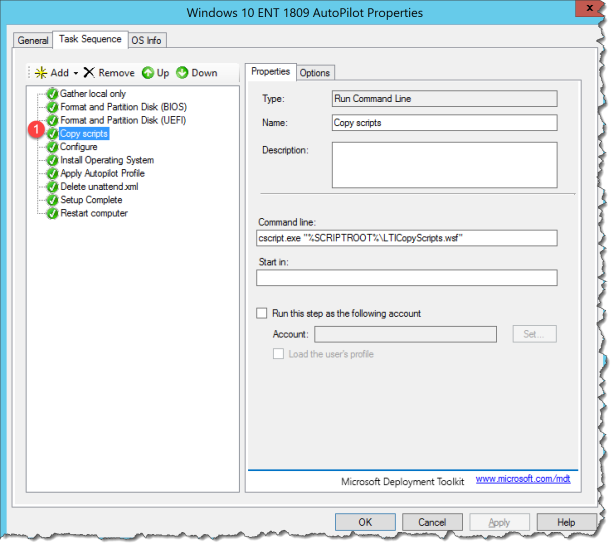
4 : Copy scripts
This step is to use the build-in functions of MDT
- Create a new “Run Command Line” action with the command line : script.exe “%SCRIPTROOT%\LTICopyScripts.wsf”
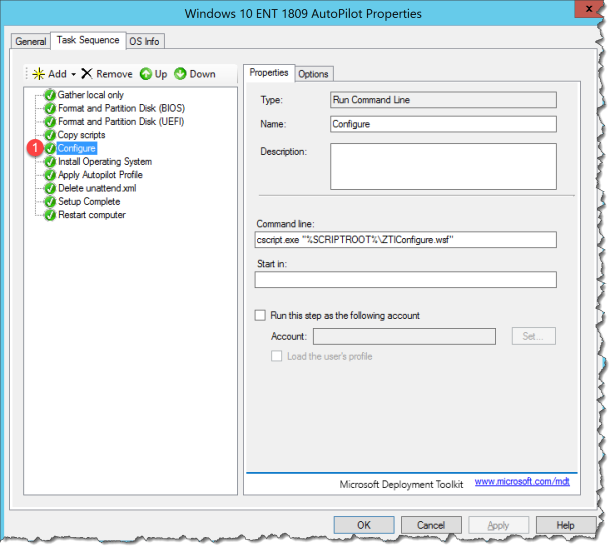
5 : Configure
This step is to use the build-in functions of MDT
- Create a new “Run Command Line” action with the command line : scscript.exe “%SCRIPTROOT%\ZTIConfigure.wsf”
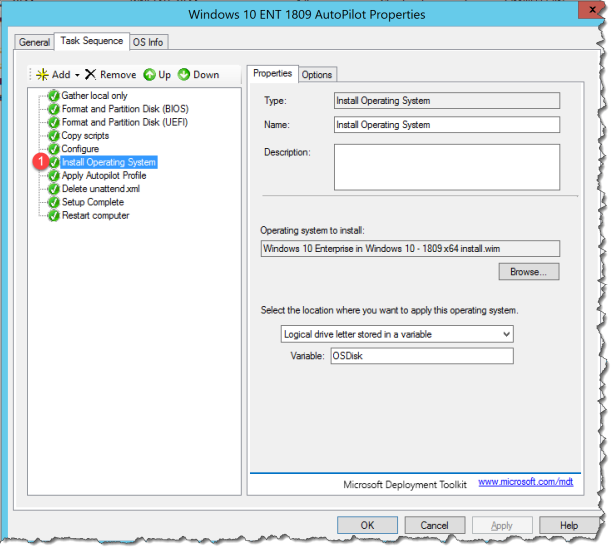
6 : Install Operating System
This step is to use the build-in functions of MDT for installing the OS
- Create a new “Install Operating System” action and select the OS you want to install
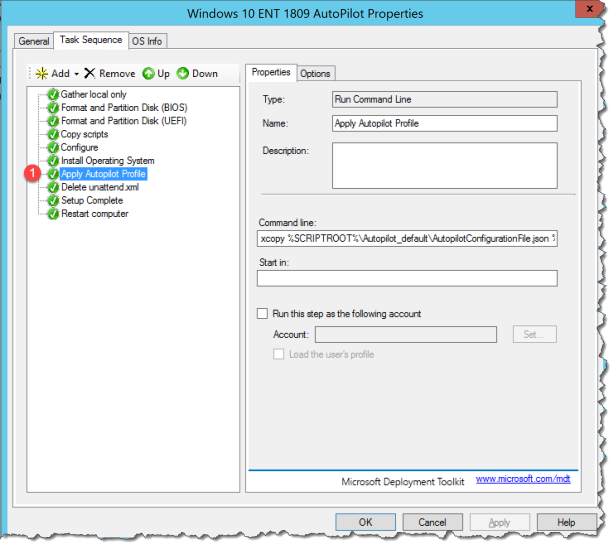
7 : Apply Autopilot Profile
This step is to apply the AutopilotConfigurationFile.json to the new device
Create a step to get the AutopilotConfigurationFile.json onto the new installed Windows 10 1809 or later – in my case I have created a folder in the MDT Deployment Share under scripts with my custom scripts.
- Create a step “Run Command Line ” enter the Command line : xcopy %SCRIPTROOT%\Autopilot_default\AutopilotConfigurationFile.json %OSDisk%\Windows\provisioning\AutoPilot\ /c
8 : Delete unattend.xml
This step is to remove the unattend.xml file – so that Windows will start up in OOBE instead of continue to be deployed with the MDT Task Sequence
- Create a new “Run Command Line” action with the command line : cmd.exe /c del %OSDisk%\Windows\Panther\unattend.xml /s

9 : Setup Complete
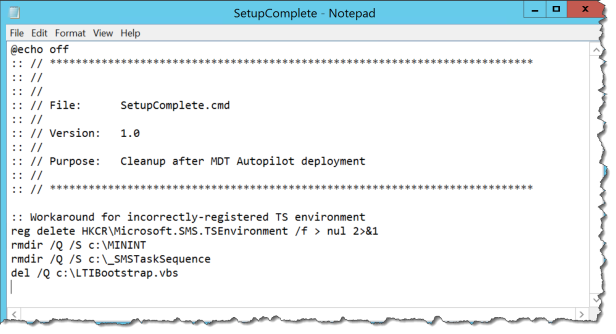
This step is to copy the SetupComplete.cmd so that Windows Setup will run this script before the logon screens appears, the script will in this case cleanup after we just have broken the MDT deployment. Read more about SetupComplete.cmd
- Create a new “Run Command Line” action with the command line : xcopy %SCRIPTROOT%\Autopilot_default\SetupComplete.cmd %OSDisk%\Windows\Setup\Scripts\ /c
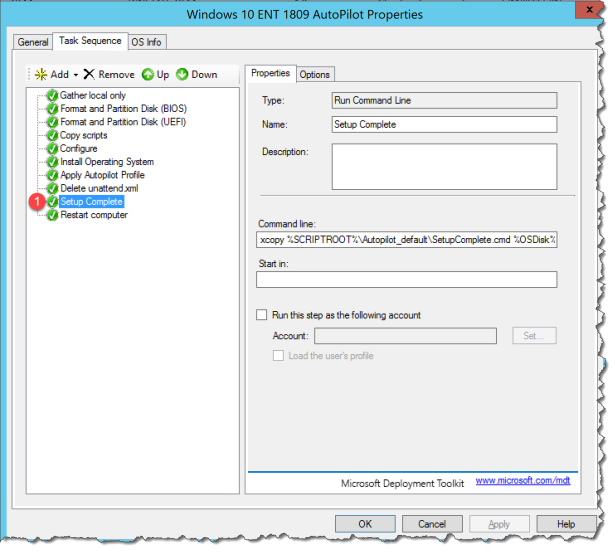
You need to create a SetupComplete.cmd script to clean up the last from MDT, the one I use can be downloaded from here
10 : Restart computer
This step is to restart the computer so the end user will be able to get the OOBE expirence
- Create a set to Restart computer
What is the end user experience:
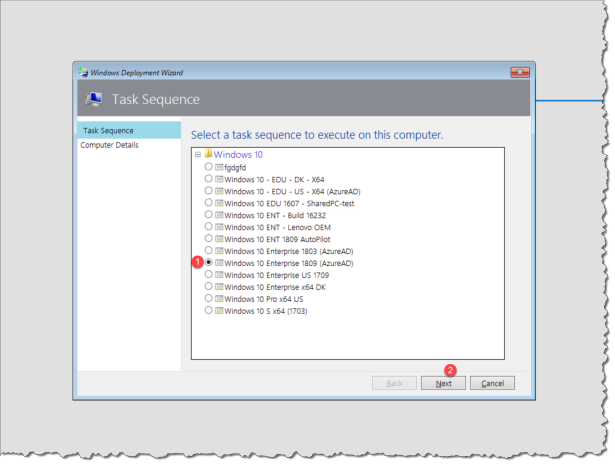
When you boot up into your MDT deployment share you will get a menu of all your MDT task Sequences – if you have not automated this step
- Select the Task Sequence with the Autopilot modifications
- Click Next
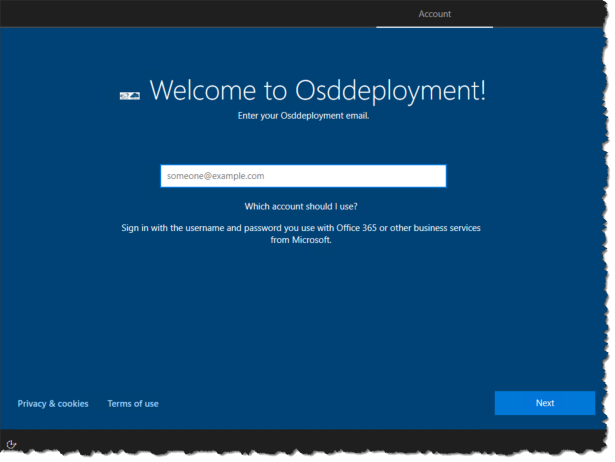
After the OS Deployment and sysprep of the device, the next three screens is the region and keyboard part of the OOBE – then the end user can enter there user name.
Happy testing!
Read more:
Upgrade Windows 7 using Windows Autopilot in Configuration Manager
New Windows Autopilot capabilities and expanded partner support simplify modern device deployment
Windows Autopilot for existing devices


I think you can skip the SetupComplete.cmd cleanup and the restart step if you set FinishAction=REBOOT and perhaps SkipFinalSummary=YES in CustomSettings.ini. Also, your task sequence doesn’t copy drivers, so it won’t work when you are using a physical machine that uses them. (That’s actually the hardest part here, because of how MDT injects the drivers. One of these days, I’ll blog how to get around that…)
Time for some more testing – thanks
MDT throws an error on physical machine, is there a solution to this?
Hi
Did you ever get around to bloging how to inject drivers without an unattend.xml?
If so I love to read/use it.
Did you ever create that blog? I see another blog where you attached AutopilotExistingDevices_Fast_v2.zip . I know that has the driver step in it, but since I’m using MDT I cant import it. Love to know how to inject drivers without the unattend.
Isn’t there an easy way to inject the AutopilotconfigurationJSON file to WIM file with DISM to RTM ISO file?
So I keep failing because theres no Autopilot folder in the C:\WIndows\Provisioning folder in any installation I use. Is this normal or do I need to add the folder???
Xcopy not create folder. Have you special version of xcopy? Do you capture image without sysprepred? When and how apply json file before capture custom image or deployment custom imagen? Than you.
Another issue here is that the deployment completely fails on my end because after the Install OS it does not find the unattended.xml file because it does not get created in a custom task sequence.
Hi, could you solve this problem?
I just created an unattend.xml file like RH posted below, also i clicked the “Continue on error” on the delete unattend.xml step. Which was crucial for me inorder to complete the task sequence. (Windows 11 22h2).
When deploying the Autopilot configuration to these devices do they automatically get added into the autopilot section in intune in case an user resets the device down the road? Will all these steps apply when using SCCM current branch or is this just for MDT and WDS?
Thanks!
If you take a look at one of the last links in my blogpost there is a way with SCCM and it works great
Hi, I would also like to install application via MDT for the Autopilot devices, I have added an “Install Applications” task after the “Install Operating System” task however it fails with following error.
“The task sequence has been suspended. LiteTouch is trying to install applications. This cannot be performed in Windows PE.”
screenshot: https://win1337ist.files.wordpress.com/2011/07/task-suspended.png
Has anyone managed to get the application installation working ?
thank you.
Hi Per,
Have you tried this with Self-Deploying mode? It fails each time for us. Realize that it’s in preview, but enormous value if it actually works.
No – have not tried it with self-deploying – but if the hardware it should work. Where is it falling?
Crazy fast reply 🙂
After doing some research before answering, it seems that 1903 now works. Previously we got a “Securing your hardware”, with Failed: 0x800705b4
I’ll report back if it works. We tried for many weeks in February.
Do you know if this works with the Autopilot Hybrid AzureAD Join feature?
It will
The HWID doesn’t seem to ever get imported into Windows Autopilot Devices under Windows Enrollment. The machines never seem to get a ZTDID either so my dynamic group with policies and profiles applied to Autopilot devices never get applied. We have gone through the process outlined here in the walkthrough without much luck. Although the Windows Autopilot payload seems to be applied because the device gets presented with the Welcome to (Company) message and then goes through the normal Autopilot screens. It just doesn’t look like the HWID is pulled from the machine and imported into Autopilot automatically like I had hoped. Has anyone else experience d this?
I used the following Powershell script to upload the HWID via Graph API from the tasksequence.
Set-ExecutionPolicy -ExecutionPolicy Bypass
Install-PackageProvider -Name NuGet -MinimumVersion 2.8.5.201 -Force
Install-Script -Name Upload-WindowsAutopilotDeviceInfo -force -confirm:$false -Scope “AllUsers”
$tenant=””
$username = “”
$password = “”
$secureStringPwd = $password | ConvertTo-SecureString -AsPlainText -Force
$creds = New-Object System.Management.Automation.PSCredential -ArgumentList $username, $secureStringPwd
$OrderIdentifier = “AutoPilotImport”
Get-MSIntuneAuthToken -TenantName $tenant -Credential $creds
#cd “$env:ProgramFiles\WindowsPowerShell\Scripts”
Upload-WindowsAutopilotDeviceInfo -TenantName $tenant -OrderIdentifier $OrderIdentifier
#Wait for AutoPilot Sync to Complete
Start-Sleep -Seconds 300
Absolute gold
Hi. Regarding credentials should I use for this, how do I know that the user has correct permissions? Also, where in the task sequence would you add this? Before last reboot?
Cheers, where in the Task sequence do you run this?
Did you need to setup an App Registration/special Graph API permissions for this to work, or just this script?
For me its not working with the self-deploying function, even on 1903. I get the same error as Nima Gharib at the step “securing your hardware” with Failed: 0x800705b4. Any ideas as to why this doensn’t work?
I hace to look into that
I get the same error as Nima Gharib at the step “Securing your hardware”, with Failed: 0x800705b4. Any ideas as to why this fails?
This is almost always a TPM attestation issue. See https://oofhours.com/2019/07/09/tpm-attestation-what-can-possibly-go-wrong/ for more details.
After troubleshooting this problem,
i resolved all the issues,
the only issue that i have is after the windows installation the next step is a reboot. somewhere between step 6/7 there is a problem.
the device is rebooting without a problem but will stay on “please wait”
this seems to last forever.
After troubleshooting this problem,
i resolved all the issues,
the only issue that i have is after the windows installation the next step is a reboot. somewhere between step 6/7 there is a problem.
the device is rebooting without a problem but will stay on “please wait”
this seems to last forever.
Hi,
I did all the steps, the device enrolled to Intune, but I don’t see the device under Autopilot devices. Only as Azure AD join. How can I deploy this device perfectly to Autopilot? Do I have to import the csv of the device? Any way to import the csv during the enrollment from the task sequence?
Did the JSON file get to the device in the right folder?
Hi,
Yes! the file “AutopilotConfigurationFile.json” under c:\Windows\provisioning\AutoPilot in the device after the deployment.
Unfortunately, still can’t see the device under “Autopilot devices” in Azure portal. Does it supposed to appear there automatically? Without putting the CSV device details?
Thank you for your help.
Hi my setup worked with this BUT
With Windows 10 version 1903 and version 1909, Autopilot has a known issue where Sysprep deletes the AutopilotConfigurationFile.json file.
source, any idea how to fix it?
Anyone aware of any issues with MDt applying the unattend xml?
step 8: delete the unattended.xml. that’s why the unattended isn’t applied 🙂
Great article, will there be an updated one for version 2004?
@mtniehaus, any writeup about drivers?
While it “works”, the end product is definitely NO device in Autopilot section, so it seems that AutopilotConfigurationFile.json on its own, is not enough. As per Jogn above: upload the HWID via Graph API from the tasksequence, is not ideal, because it means the FULL TS, which I am trying to avoid. Also with Win 10 2004 after device got setup & at login prompt (and powered off), it came back to the same stage on reboot
Hi,
thanks for the great post.
Does this solution deploy applications targeted with Autopilot profiles?
Hey
When deploying from SCCM using this TS. https://oofhours.com/2020/09/08/speeding-up-windows-autopilot-for-existing-devices/ it failes ““Securing your hardware”, with Failed: 0x800705b4.”
Running certutil -tpminfo at the ESP – it has shows: “No Manufacturer Endorsement Key Certificates” and “No Other Endorsement Key Certificates”
If I start Windows installation fra an USB/ISO – it shows Manufacturer Endorsement Key Certificates – and it works.
Why?
Michael
Hi Michael
I get the same, did you ever resolve this?
I have the same issue with error 0x800705b4. Any ideas?
Few years later and I’m running a Windows 11 deployment in MDT.
What’s important when you run the custom task sequence, is that you at least generate a unattend.xml file and place it in the same folder as the custom task sequence ID.
I got it directly out of the box, sign in screen from our company.
It still works without any noticable errors.
Can you please explain the unattend.xml part? I am not able to boot Windows 11 with OOBE via MDT.
This seems to work so far from what I can tell. One issue is its not naming the PC what I have set in MDT, its naming it Desktop-******. This seems to be from removing the Unattend file.
As a test, I removed the Autopilot step and its still not naming it right. Next I removed it deleting the Unattend file and it names it right so I know the MDT process is working. I will admit I don’t know a ton about all of this but is there a way around this? We need the logic in MDT to be able to name the PC before its joined to Azure AD.
Thanks!
Scott
works like a charm (Win10 21H1, 21H2) with MDT.
created a small improvement.
because MDT injects the drivers, leaves them in the C:\drivers folder, updates the unattended.xml, but the unattended.xml is removed the drivers are never applied in the stages between PE and OOBE. This leaves a lot of devices with unuseable devices like webcams, fingerprint readers or even sound.
Fixed that by adjusting the SetupComplete.cmd with an additional line to import a registry file (exported from a working device).
This registry setting needs to be placed in the same folder as SetupComplete.cmd during the OSD TS. easy to test with a vmware VM (create 2 NIC, 1 with VMXnet3 and the other with E1000) and verify during the ‘enter your emailaddress’ stage by pressing CTRL+SHIFT+F3 to enter Windows audit mode and opening up devicemanager (or finish the autopilot config). After successfully installing all drivers my Windows Hello configuration now asks for a fingerprint prior to enter a pin, instead of asking for a pin directly and skipping the fingerprint (because it doesn’t work yet)
Tested on several device of which one is an older HP Elite X2 1012 G1 Tablet
Great article, Does the device need to be azure registered beforehand for this MDT method to work or can we pick up any device and pxe boot it?
Im having an issue in which the Region / Locales do not get set – due to the task sequence deleting the unattend.xml file (i assume).
Has anyone been able to get this working and also have region/locales/keyboards being set correctly?
Fantastic article. Quick one. I cannot get the AutoPilot window to show up after MDT deploy on a custom captured wim, however it works on the Microsoft out of the box .wim. Is this because I sysprepped the .wim before capture? I would like to enable this with a custom .wim to cut down of post enrollment installs/config